Taguchi Orthogonal Arrays: Difference between revisions

From ReliaWiki
Jump to navigation Jump to search
Line 7: Line 7:
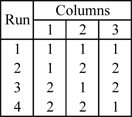
'''L4 (2^3)'''
'''L4 (2^3)'''


[[Image:ct1.png|thumb|center|500px|]]
[[File:ct1.png|center]]


Line 15: Line 13:


[[Image:ct2.png|thumb|center|500px|]]
[[File:ct2.png|center]]


Line 23: Line 19:


[[File:ct3.png|center]]
[[Image:ct3.png|thumb|center|500px|]]


Line 29: Line 25:


[[File:ct4.png|center]]
[[Image:ct4.png|thumb|center|500px|]]


==Three Level Designs==

Revision as of 22:55, 15 August 2011

New format available! This reference is now available in a new format that offers faster page load, improved display for calculations and images, more targeted search and the latest content available as a PDF. As of September 2023, this Reliawiki page will not continue to be updated. Please update all links and bookmarks to the latest reference at help.reliasoft.com/reference/experiment_design_and_analysis

Chapter {{{1}}}: Taguchi Orthogonal Arrays


DOEbox.png

Chapter {{{1}}}  
Taguchi Orthogonal Arrays  

Synthesis-icon.png

Available Software:
Weibull++

Examples icon.png

More Resources:
DOE examples


Reference Appendix C: Taguchi's Orthogonal Arrays

Two Level Designs

L4 (2^3)

Ct1.png


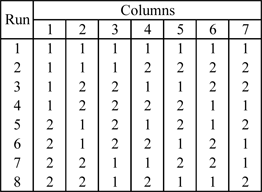
L8 (2^7)


Ct2.png


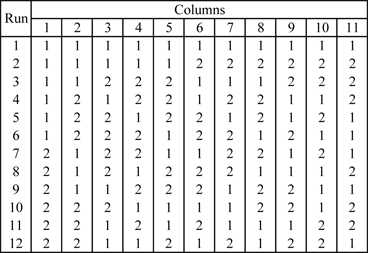
L12 (2^11)


Ct3.png


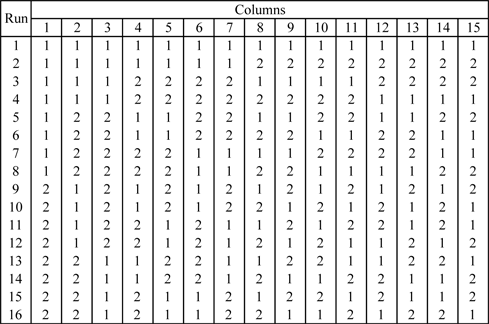
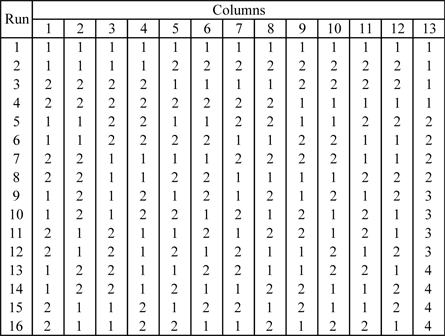
L16 (2^15)


Ct4.png

Three Level Designs

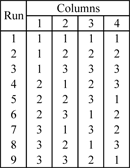
L9 (3^4)


Ct5.png


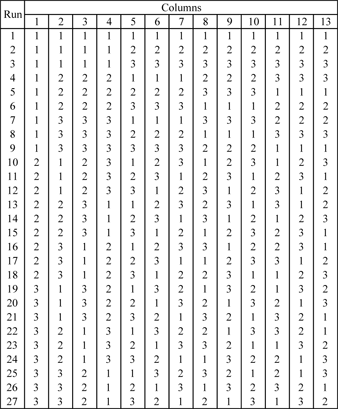
L27 (3^13)


Ct6.png

Mixed Level Designs

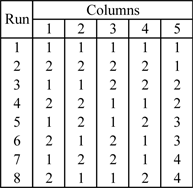
L8 (2^4 4^1)


Ct7.png


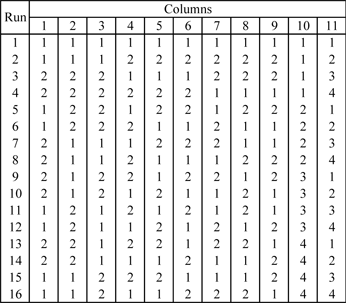
L16 (2^12 4^1)


Ct8.png


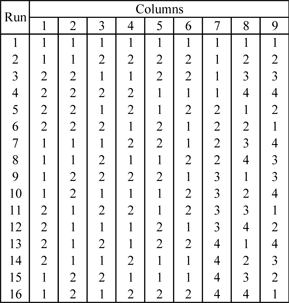
L16 (2^9 4^2)


Ct9.png


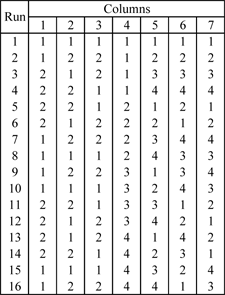
L16 (2^6 4^3)


Ct10.png


L16 (2^3 4^4)


Ct11.png


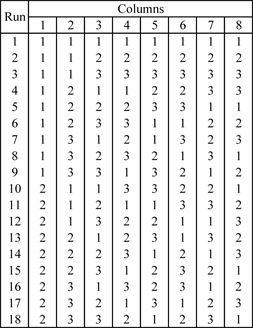
L18 (2^1 3^7)


Ct12.png