Reliability Phase Diagrams (RPDs)
Introduction to Reliability Phase Diagrams
The term phase diagram is used in many disciplines with different meanings. In physical chemistry, mineralogy and materials science, a phase diagram is a type of graph used to show the equilibrium conditions among the thermodynamically-distinct phases. In mathematics and physics, a phase diagram is used as a synonym for a phase space. In reliability engineering we introduce the term phase diagram, or more specifically Reliability Phase Diagram or RPD as an extension of the reliability block diagram (RBD) approach to graphically describe the sequence of different operational and/or maintenance phases experienced by a system. Whereas a reliability block diagram (RBD) is used to analyze the reliability of a system with a fixed configuration, a phase diagram can be used to represent/analyze a system whose reliability configuration and/or other properties change over time. In other words, during a mission the system may undergo changes in its reliability configuration (RBD), available resources or the failure, maintenance and/or throughput properties of its individual components. Examples of this include:
- Systems whose components exhibit different failure distributions depending on changes in the stress on the system.
- Systems or processes requiring different equipment to function over a cycle, such as start-up, normal production, shut-down, scheduled maintenance, etc.
- Systems whose RBD configuration changes at different times, such as the RBD of the engine configuration on a four-engine aircraft during taxi, take-off, cruising, and landing.
- Systems with different types of machinery operating during day and night shifts and with different amounts of throughput during each shift.
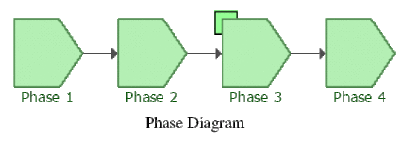
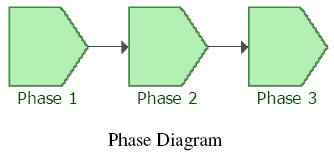
To analyze such systems, each stage during the mission can be represented by a phase whose properties are inherited from an RBD corresponding to that phase's reliability configuration, along with any associated resources of the system during that time. A phase diagram is then a series of such phases drawn (connected) in a sequence signifying a chronological order.
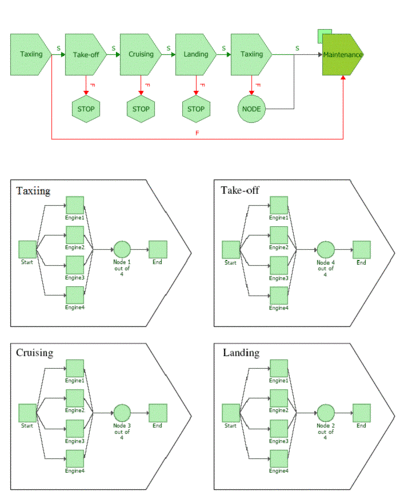
To better illustrate this, consider the four-engine aircraft mentioned previously. Assume that when a critical failure (system failure) occurs during taxiing, the airplane does not take off and is sent for maintenance instead. However, when a critical failure occurs during take-off, cruising, landing, the system is assumed to be lost.
Furthermore, assume that the taxi phase requires only one engine, the take-off phase requires all four engines, the cruising phase requires any three of the four engines and the landing phase requires any two of the four engines. To model this, each one of these cases would require a different k-out-of-n redundancy on the engines and thus a different RBD. Creating an RBD for each phase is trivial. However, what you need is a way to transition from one RBD to the next, in a specified sequence, while maintaining all the past history of each component during the transition.
In other words, a new engine would transition to the next phase with an age equal to the time it was used during taxi, or an engine that failed while in flight would remain failed in the next phase, i.e. landing. To model this, an RBD for each phase would be used in the phase diagram, and each phase would be linked to the appropriate RBD. This is illustrated in Figure PhaseIntroEx. In this figure the taxiing, take-off, cruising and landing blocks represent the operational phase and the final block is a maintenance phase. Each of the operational phases in this diagram has two paths leading from it: a success path and a failure path. This graphically illustrates the consequences in each case. For instance, if the first taxiing phase is successful, the airplane will proceed to the take-off phase; if it is unsuccessful, the airplane will be sent for maintenance. The failure paths for the take-off, cruising and landing phases point to stop blocks, which indicate that the simulation of mission ends. For the final taxiing phase, both the success and failure paths lead to the maintenance path; the node block allows you to model this type of shared outcome.
The next several sections discuss different types of phases blocks: operational phase blocks, maintenance phase blocks, the subdiagram phase blocks, node blocks and the stop blocks.
Types of Phases
Operational Phase
In RPDs two types of phases are used: operational phase and maintenance phase. An operational phase is used to represent any stage of the system's mission that is not exclusively dedicated to the execution of maintenance tasks. Operational phases are always defined by (linked to) an RBD. Each operational phase has a fixed, pre-defined time duration.
Maintenance Phase
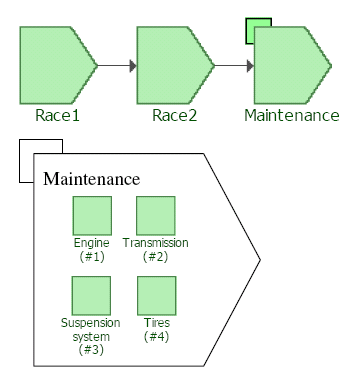
A maintenance phase represents the portion of a system's mission time where the system is down and maintenance actions are performed on some or all of its components. For representation ease a maintenance phase is defined by (linked to) a maintenance template. This template can be thought of as a list, or a collection, of the specific components (blocks) that are designated to undergo inspection, repair or replacement actions during the maintenance phase, along with their maintenance priority order. In other words, if blocks A, B and C are to undergo maintenance during a specific phase, they are placed in a maintenance template in a priority sequence. Depending on the resources available, the actions are prioritized as resources permit. That is, if three repair crews were available along with three spare parts, actions on A, B and C would be carried out simultaneously. However, if only one crew was available, the actions would be carried out based on the priority order defined in the template. Given that all aspects of maintenance can be probabilistically defined, the duration of a maintenance phase, unlike an operational phase, is not fixed and the phase lasts as long as it takes to complete all actions specified in the phase. To illustrate this, consider a race car that competes in two races, and even though corrective repair actions can be done during each race as needed, the race car then undergoes a major overhaul (i.e. series of maintenance actions). For this example assume the major sub-systems of the car undergoing these maintenance tasks are the engine, the transmission, the suspension system and the tires. The operation of the race car can then be represented as a phase diagram consisting of two operational phases, representing the two races, and one maintenance phase representing the maintenance activities.
Figure PhaseTypeEx shows such a phase diagram along with the maintenance template.
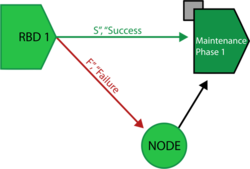
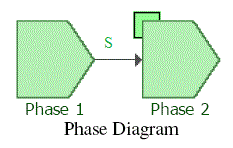
The Success and Failure Path
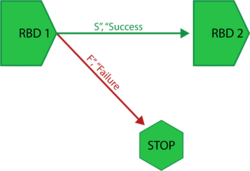
For a failure path, on system failure, system go to somewhere immediately when failure occurs. For a success path, if there is no system failure during this phase, system goes to somewhere by the end of the current phase.
In BlockSim 7, there was only one path from each phase. The failure outcome for each phase as defined via a drop-down list. The success and failure path used in BlockSim 8 make it easy to see what will happen upon success or failure for each block. They also allow you to create more complex phase diagrams, in which success and failure may lead to entirely different sets of phases. In addition, they offer an additional possible outcome of failure. Previously, the outcome of failure could be maintenance, stopping the simulation or continuing the simulation; now another possible outcome of failure can be continuing simulation on a different path.
Examples
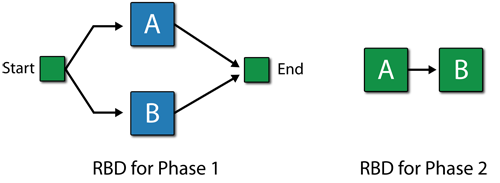
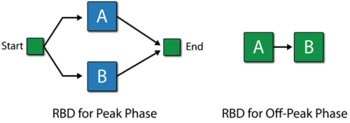
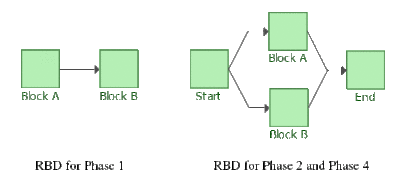
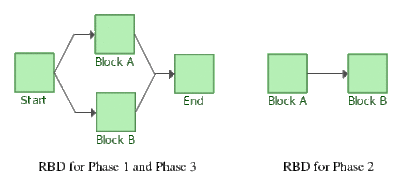
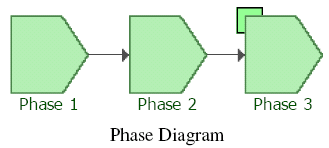
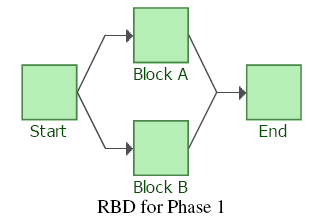
Consider a system whose RBDs for Phase 1 and Phase 2 are as followings:
In Phase 1, Block A follows Weibull distribution with Beta = 1.5 and Eta = 1000 hours. Block B follows Weibull distribution with Beta = 1.5 and Eta = 1200 hours. No maintenance.
In Phase 2, Block A follows Weibull distribution with Beta = 1.5 and Eta = 900 hours. Block B follows Weibull distribution with Beta = 1.5 and Eta = 1150 hours. No maintenance.
Node Blocks and Stop Blocks
In BlockSim 8, the two possible outcomes of an operational phase block are modeled using success and failure paths. Where previously a failure outcome was defined as part of the operational phase block's properties, it is now graphically represented within the diagram. Node blocks and stop blocks are provided in version 8 to allow you to build configurations that are both accurate and readable.
Node Blocks
The purpose of a node block is simply to enable configurations that would otherwise not be possible due to limitations on connecting blocks. For example, consider an instance where maintenance is scheduled to be performed after the operational phase has completed successfully, and if a failure occurs during simulation, that maintenance will take place upon failure. In this case, the operational phase block's success and failure outcomes are identical. Success paths and failure paths cannot be identical in phase diagrams, however, so you would model this configuration in one of two ways:
- If the operational phase stops upon failure of the block and the simulation moves to the next phase along the success path, you would use a node block to model this configuration, as shown next.
- If the operational phase continues for the specified duration despite failure and the simulation then moves to the next phase along the success path, you would simply not create a failure path.
Node blocks can have unlimited incoming connections and a single outgoing connection.
Stop Blocks
Stop blocks indicate that the simulation of the mission ends. A new simulation may then begin, if applicable. This is useful in situations where maintenance is not possible upon failure.
Stop blocks can have unlimited incoming connections. No outgoing connections can be defined for stop blocks.
Subdiagram Phase Blocks
Subdiagram phase blocks represent other phase diagrams within the project. Using subdiagram phase blocks allows you to incorporate phase diagrams as phases within other phase diagrams. This allows you to break down extremely complex configurations into smaller diagrams, increasing understandability and ease of use and avoiding unnecessary repetition of elements.
Subdiagram phase blocks can have unlimited incoming connections and up to two outgoing connections, which may include one success path and one failure path. The success path and the failure path must be different; if both success and failure of the block actually lead to the same outcome, you can use a node block to model this configuration.
Example
Consider to model a server has two shifts each day, the day shift lasts 8 hours and the night shift lasts 16 hours. In each shift it has peak period and off-peak period with different duration.
The RBDs for Peak phase and Off-Peak phase are as followings:
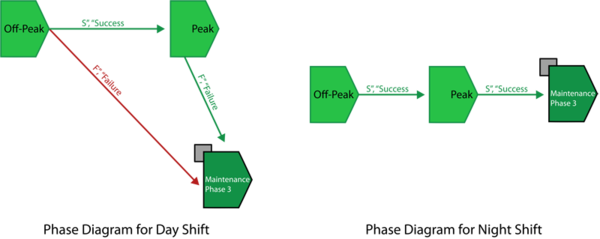
The phase diagram for Night Shift and Day Shift are as followings:
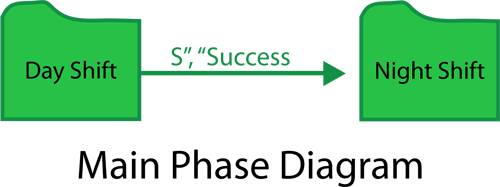
The main phase diagram with phase subdiagram blocks is as followings:
In Peak period, reliability of Block A follows W(1.5,30) and reliability of Block B follows W(1.5,40). In Off-Peak period, reliability of Block A follows W(1.5,15) and reliability of Block B follows W(1.5,20). In Day Shift, both blocks have CM and PM with duration = 1 hours and in Night Shift, both blocks have CM and PM with duration = 2 hours. In Day Shift, the duration of Off-Peak phase is 4 hours and the duration for Peak phase is 3 hours. In Night Shift, the duration of Off-Peak phase is 8 hours and the duration for Peak phase is 6 hours.
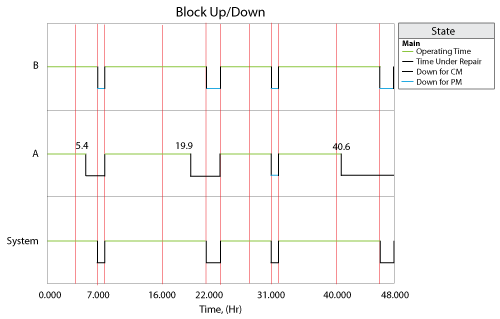
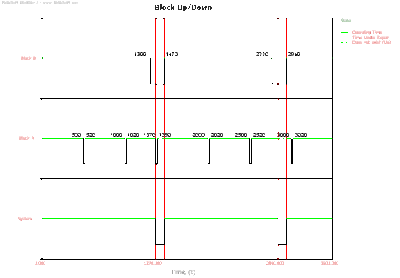
The system logs for 2 days (48 hours) is as followings:
- At time 5.4, in Peak phase of Day Shift, Block A fails. After this Peak phase, Block A get CM and Block B get PM in maintenance phase.
- At time 19.9, in Peak phase of Night Shift, Block A fails again. After this Peak phase, Block A get CM and Block B get PM in maintenance phase.
- At time 40.6, in Peak phase of Night Shift, Block A fails again. After this Peak phase, Block A get CM and Block B get PM in maintenance phase.
Cycles and Phase Diagram Execution
The execution of a phase diagram from its first phase to its last phase is referred to as one cycle. If the simulation end time exceeds the total duration of one cycle of a phase diagram, the simulation continues and the phase diagram is executed multiple times until the simulation end time is reached. Execution of a phase diagram multiple times during a simulation is referred to as cycling. During cycling, the age of components accumulated in the last phase of the previous cycle is carried over to the first phase of the next cycle. The principle of cumulative damage is used to transfer the age across phases for each component (block). For more discussion on this see the Age Transfer Across Phases Using Cumulative Damage section (Section 11.6.1.1) later on in this chapter. In summary, cycling is used to model the continuous operation of a system involving repetition of the same phases in the same sequence.
Working with Phase Diagrams
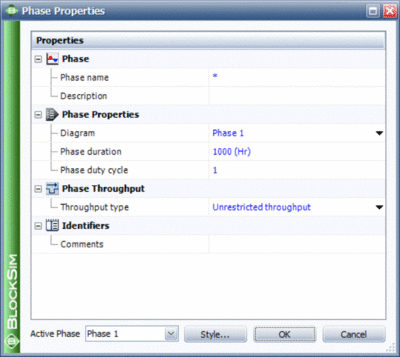
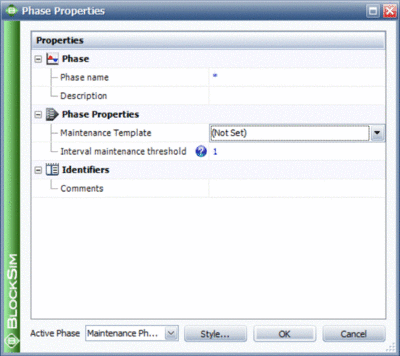
To allow modeling flexibility, a number of options can be specified for both operational and maintenance phases. These options, called Phase Properties, are shown in Figure OperationalPhaseOptions for an operational phase and in Figure MaintenancePhaseOptions for a maintenance phase. These properties are discussed in more detail in the sections that follow. An additional property, Phase Throughput, also defined as an operational phase property, is discussed Section 11.10.
Operational Phase Properties
Diagram
The diagram property is used to associate an RBD with a phase. You can select and associate any existing RBD with a phase. Note that common components across different RBDs are identified by name. In other words, a component with the exact same name in two RBDs is assumed to be the same component working in two different phases.
Phase Duration
The duration of an operational phase is fixed and needs to be specified. Even though no time units are specified, it is implied that the same unit of measure is used throughout the model and on all inputs. However, this duration may be affected by the choice of action you choose to perform on system failure as specified in the On System Failure property. This is discussed in the On System Failure Options subsection.
Phase Duty Cycle
This property allows for the specification of a common duty cycle value for all the components in the current operational phase. BlockSim applies this duty cycle to all the units in the operational phase. This is in addition to any duty cycle value that may have been specified at the block level. To illustrate this, consider two components A and B. A has an individual duty cycle of 2 and B has the default value of 1. If both of these components are included in a phase with a phase duty cycle of 0.5, then the overall duty cycle value for A is 1 (2 [math]\displaystyle{ \times }[/math] 0.5), while the overall duty cycle value for B is 0.5 (1 [math]\displaystyle{ \times }[/math] 0.5). The concept of the duty cycle is discussed in Chapter 5, Section 5.3.
On System Failure Options
This property is used to set a specific action when a system failure occurs in a phase. There are three options:
- • Continue simulation.
- • Start new simulation.
- • Go to maintenance phase.
These options are discussed in the next sections.
Continue Simulation
This is the default option. Under this option, when a system failure occurs, repairs begin as per the repair policy selected and the time to restore the system is part of the operational phase's time. In other words, the repairs continue in the operational phase until the system is up again. If the repairs are not completed before the phase ends, the repairs continue into the next phase. Thus, under this option the duration of an operational phase is not affected by a system failure.
As an example of this option, consider a production line operating in two phases of day and night shifts. A failure occurs in the day shift that renders the production line non-operational. Repair of the production line begins immediately and continues beyond the day shift. The production line is back up after midnight. In this case the repair of the production line exhausts all of the duration of the day shift phase from the time of the failure to the end of the phase. Some part of the night shift phase is also exhausted.
Start New Simulation
This option halts the simulation, which effectively means the end of the mission if the system fails. Specifically, if this option is selected upon system failure the execution of the current operational phase and all phases that follow the current phase is halted, and the mission aborted. This option can be used to model a system whose failure cannot be repaired and the mission has to be aborted if a failure occurs. A good example of this would be the aircraft case discussed previously. A catastrophic failure during cruising would end the mission.
Step-by-Step
To better understand each of the previously mentioned options, three step-by-step examples are presented in this section. Each simple example is intended to illustrate the usage and assumptions/rules used in each option. Furthermore, in addition to the examples, a detailed list of rules (and/or assumptions) made are provided in the next section.
Example Using the Continue Simulation Option
To illustrate the Continue Simulation option, consider the deterministic scenario represented in Figures excont1 , excont2 and excont3.
In this example, a system has two components: Block A and Block B. The system undertakes a mission that can be divided into four phases. The first phase is an operational phase of duration 1000 hrs with both the components in series. In this phase Block A fails every 550 hrs while Block B fails every 750 hrs. Corrective maintenance actions on each of the components in this phase require 50 hrs to be completed. The second phase of the mission is also an operational phase in which the two components function in a parallel configuration. In this phase Block A fails every 450 hrs while Block B fails every 800 hrs. No maintenance actions can be performed on the components in this phase. The duration of the second phase is 700 hrs. The third phase for the system is a maintenance phase where corrective maintenance is performed on the failed components and preventive maintenance is performed on the non-failed components. The duration of the corrective maintenance is 100 hrs while the duration for the preventive maintenance is 20 hrs. The fourth phase of the mission is an operational phase which is identical to the second phase, but has a duration of 200 hrs.
All maintenance actions during the entire mission of the system have a Type II restoration factor of 1. All operational phases have the Continue Simulation option selected for the On System Failure property.
The system behavior from 0 to 2000 hrs is shown in Figure ContinueSimEx and described next.
- Phase 1 begins at 0 hrs. The duration of phase 1 is 1000 hrs.
- At 550 hrs Block A fails in phase 1. Block A is in series with Block B in this phase. Hence the failure of Block A results in a system failure at 550 hrs. Since the Continue Simulation option is selected for this phase, repairs begin on Block A in phase 1 itself. The duration of corrective maintenance for Block A in phase 1 is 50 hrs. Block A is repaired from 550 hrs to 600 hrs.
- At 800 hrs Block B fails in phase 1. This again leads to a system failure at 800 hrs as Block B is in series with Block A in phase 1. Under the Continue Simulation option, repairs begin on Block B in phase 1. Block B is repaired from 800 hrs to 850 hrs.
- At 1000 hrs phase 1 ends and phase 2 begins. The duration of phase 2 is 700 hrs.
- At 1450 hrs Block A fails in phase 2, having accumulated an age of 450 hrs. Block A is in a parallel configuration with Block B in this phase. Thus the failure of Block A does not lead to a system failure. Since Block A cannot be repaired in phase 2, it remains failed until the end of the phase.
- At 1700 hrs phase 2 ends and phase 3 begins. Phase 3 is a maintenance phase. Since Block A enters phase 3 in a failed state, it is subjected to a corrective maintenance of 100 hrs duration from 1700 hrs to 1800 hrs. Block B does not enter phase 3 in a failed state and hence undergoes preventive maintenance of 20 hrs duration from 1700 hrs to 1720 hrs.
- At 1800 hrs all maintenance actions in phase 3 are completed and phase 3 ends. Phase 4 begins at this time. The duration of phase 4 is 200 hrs.
- At 2000 hrs phase 4 ends. This also marks the end of the mission.
Age Transfer Across Phases Using Cumulative Damage
The age transfer principle is crucial in understanding the concept of phases. Components accumulate age (wear-out) as they go from phase to phase, and their accumulated age is directly related to their probability of failure during the next phase. In other words, any damage the component may have accumulated in the previous phase is carried to the next phase (unless the component was restored). First it is important to note that a component (a block) may have a different failure distribution in different phases, and may have accumulated a different level of damage in each phase. Thus, to correctly transfer the age of such a block across phases, the principle of cumulative damage is used. The principle and its implementation in phase diagrams is best illustrated by example. Assume that you have a single component A subjected to two phases of 500 hrs and 200 hrs duration respectively. Furthermore, assume that [math]\displaystyle{ A }[/math] follows a Weibull distribution in phase 1 with [math]\displaystyle{ \beta =1.5 }[/math] and [math]\displaystyle{ \eta =650 }[/math] , while in phase 2 it follows a Weibull distribution with [math]\displaystyle{ \beta =1.5 }[/math] and [math]\displaystyle{ \eta =700 }[/math] .
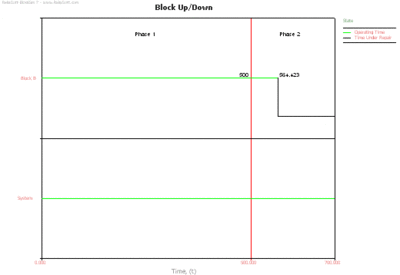
An example (one random scenario) of this system's behavior is shown in Figure AgeTransferEx and explained as follows:
- 1. At 0 hrs phase 1 begins. A uniform random number [math]\displaystyle{ {{U}_{R}}[0,1]=0.2534 }[/math] is generated and the age of Block A ( [math]\displaystyle{ T }[/math] ) in phase 1 is calculated using the reliability equation of the Weibull distribution W(1.5, 650) as follows:
- [math]\displaystyle{ \begin{align} {{R}_{1}}(T)= & {{e}^{-{{(\tfrac{T}{{{\eta }_{1}}})}^{{{\beta }_{1}}}}}} \\ \text{ }0.2534= & {{e}^{-{{(\tfrac{T}{650})}^{1.5}}}} \\ T= & 802.9405 \end{align} }[/math]
The duration of phase 1 is 500 hrs. Thus Block A will not fail in phase 1 because the phase ends before the block reaches its time to failure.
- 2. At 500 hrs phase 1 ends. The age of 500 hrs accumulated by Block A in phase 1 is represented by [math]\displaystyle{ {{T}_{1}} }[/math] . The reliability of Block A at the end of phase 1 is:
- [math]\displaystyle{ \begin{align} {{R}_{1}}({{T}_{1}})= & {{e}^{-{{(\tfrac{{{T}_{1}}}{{{\eta }_{1}}})}^{{{\beta }_{1}}}}}} \\ = & {{e}^{-{{(\tfrac{500}{650})}^{1.5}}}} \\ = & 0.5093 \end{align} }[/math]
- 3. At 500 hrs phase 2 begins. At the start of phase 2, [math]\displaystyle{ A }[/math] accumulated a certain amount of damage in phase 1 on the account of 500 hrs of operation in phase 1. Now, given the fact that the distribution in phase 2 is different from phase 1 (i.e. the stress experienced in phase 2 is different), you need to compute an equivalent time of operation in phase 2 that would have caused the same (equivalent) amount of damage as if the block only operated in this phase 2. This is done by observing that the reliability of Block A at the beginning of phase 2 is the same as its reliability at the end of phase 1, since these two events occur at the same point in time. Thus the equivalent starting age of Block A ( [math]\displaystyle{ {{T}_{2}} }[/math] ) in phase 2 can be calculated using the reliability value at the end of phase 1 and the reliability equation of the Weibull distribution W(1.5, 700) as shown next:
- [math]\displaystyle{ \begin{align} {{R}_{2}}({{T}_{2}})= & {{e}^{-{{(\tfrac{{{T}_{2}}}{{{\eta }_{2}}})}^{{{\beta }_{2}}}}}} \\ \text{ }0.5093= & {{e}^{-{{(\tfrac{{{T}_{2}}}{700})}^{1.5}}}} \\ \text{ }{{T}_{2}}= & 538.4924 \end{align} }[/math]
- 2. At 500 hrs phase 1 ends. The age of 500 hrs accumulated by Block A in phase 1 is represented by [math]\displaystyle{ {{T}_{1}} }[/math] . The reliability of Block A at the end of phase 1 is:
Thus Block A begins phase 2 with an equivalent age of 538.4924 hrs, instead of 500 hrs. In other words, 500 hrs in phase 1 causes the same damage as 538.4924 hrs in phase 2.
- 4. Now for phase 2 we can draw another uniform random number [math]\displaystyle{ {{U}_{R}}[0,1]=0.8828 }[/math] to obtain another reliability value for this phase. Using conditional probability, we then compute a time to failure for this phase, conditioned on the accumulated age of the block. Thus, the time to failure of Block A in phase 2 is:
- [math]\displaystyle{ \begin{align} R(t+T)= & R(t,T)\cdot R(T) \\ R(t+538.4924)= & 0.8828\cdot R(538.4924) \\ R(t+538.4924)= & 0.8828\cdot 0.5093 \\ R(t+538.4924)= & 0.4496 \\ t+538.4924= & 602.9154 \\ t= & 64.4230 \end{align} }[/math]
- 5. Thus, at the time of 564.4230 hrs Block A fails during phase 2, after accumulating 64.4230 hrs in this phase and 500 hrs in phase 1.
Example Using the Start New Simulation Option
To illustrate the Start New Simulation option, again consider the deterministic scenario represented in Figures StartNew1 , StartNe2 and StartNe3.
In this example, a system has two components: Block A and Block B. The system undertakes a mission that can be divided into three phases. The first phase is an operational phase of duration 1000 hrs with both the components in a parallel configuration. In this phase Block A fails every 550 hrs while Block B fails every 750 hrs. Corrective maintenance actions on each of the components in this phase require 50 hrs to be completed. The second phase of the mission is an operational phase of duration 700 hrs in which the two components are in series. In this phase Block A fails every 450 hrs while Block B fails every 800 hrs. The duration of the corrective maintenance tasks in this phase is 100 hrs. The third phase for the system is also an operational phase and is identical to phase 1.
All maintenance actions during the entire mission of the system have a type II restoration factor of 1. All operational phases have the Start New Simulation option selected for the On System Failure property.
The system behavior from 0 to 2500 hrs is shown in Figure StartNewSimEx and described next.
- At 0 hrs phase 1 begins. The duration of phase 1 is 1000 hrs.
- At 550 hrs Block A fails in phase 1. Block A is in a parallel configuration with Block B in this phase. Hence the failure of Block A does not result in a system failure. Repairs of duration 50 hrs begin on Block A. Block A is repaired from 550 hrs to 600 hrs.
- At 750 hrs Block B fails in phase 1. Block B is in a parallel configuration with Block A. Hence the failure of Block B does not result in a system failure. Repairs of duration 50 hrs begin on Block B. Block B is repaired from 750 hrs to 800 hrs.
- At 1000 hrs phase 1 ends and phase 2 begins. The duration of phase 2 is 700 hrs.
- At 1450 hrs Block A fails in phase 2. Block A is in a series configuration with Block B in this phase. Hence the failure of Block A results in a system failure at 1450 hrs. Since the Start New Simulation option is selected for this phase for the On System Failure property, the simulation ends at 1450 hrs and phase 3 is aborted.
Example Using the Go to Maintenance Phase Option
To illustrate the Go to Maintenance Phase option, again consider a simple system with two components: Block A and Block B. The two components make up a phase diagram for the system represented in Figures gotom1 , gotom2 and gotom3.
In this example, the first phase is an operational phase in which the two components are in series and follow failure distributions of W(1.5, 650) and W(2, 500) respectively. The duration of the first phase is 500 hrs. The second phase is an operational phase in which the components are in parallel. The failure distributions on the components in this phase are W(1.5, 700) and W(2, 1300) respectively. The duration of this phase is 700 hrs. In both the operational phases no repairs can be performed on the two components. A system failure in any of the two phases takes the system to the third phase, which is the maintenance phase. In this maintenance phase, corrective maintenance of 100 hrs duration is performed on the failed components, and preventive maintenance of 20 hrs duration is performed on the non-failed components. All maintenance actions during the maintenance phase have a type II restoration factor of 1.
The system behavior for a simulation of 1400 hrs duration is shown in Figure GotoMaintPhaseEx and explained next. Since this system is not deterministic, each simulation will give a different result according to the random failure times generated during the simulation.
- Phase 1 begins at 0 hrs. The duration of this phase is 500 hrs.
- At 500 hrs Phase 1 ends. Since no failures occur in phase 1, it is executed to its total duration of 500 hrs. Phase 2 begins at 500 hrs. The duration of phase 2 is 700 hrs.
- At 564.423 hrs Block B fails in phase 2. The time to failure of Block B in phase 2 is 64.423 hrs. This time is calculated using the cumulative damage principle (see 11.6.1.1) as Block B follows a different distribution in phase 2. Since Block B is in a parallel configuration with Block A in this phase, the failure of Block B does not lead to a system failure, as Block A is still functioning. Since no repairs can be performed in phase 2, Block B remains in a failed state.
- At 739.409 hrs Block A fails in phase 2. The time to failure for Block A in this phase is calculated using the cumulative damage principle, since the block follows a different distribution here (see 11.6.1.1). Since Block A is in a parallel configuration with Block B in this phase, and Block B has already failed, the failure of Block A leads to a system failure. Under the Go to Maintenance Phase option selected for phase 2, phase 2 ends on this system failure before completing its duration of 700 hrs. Phase 3, the maintenance phase, begins at 739.409 hrs. Both the failed components, Block A and Block B are repaired in this phase.
- At 839.409 hrs all maintenance actions in the maintenance phase are completed and the blocks are restored to as-good-as-new condition. Phase 3 ends at 839.409 hrs. This also marks the completion of the first cycle of the phase diagram. At 839.409 hrs the second cycle begins with phase 1 being executed for the second time.
- At 1278.194 hrs Block B fails in phase 1. The accumulated age of Block B at this time is 438.785. This is the age accumulated since the beginning of the second cycle. No age is transferred from the first cycle because of the perfect repair in the last phase of the first cycle. Block B is in series with Block A in this phase. Thus, the failure of Block B leads to a system failure at 1279.194 hrs. Under the Go to Maintenance Phase option selected for phase 1, phase 1 ends on this system failure before completing its duration of 500 hrs. Phase 3, the maintenance phase, begins at 1278.194 hrs. In this phase Block B is repaired for a duration of 100 hrs while Block A, which has not failed, is maintained for 20 hrs duration.
- At 1378.194 hrs all maintenance actions in the maintenance phase are completed and phase 3 ends. This completes the second cycle. Phase 1 begins in the third cycle at 1378.194 hrs.
- At 1400 hrs the simulation ends.
Rules & Assumptions
Rules & Assumptions When Transferring Interrupted Maintenances Across Phases
Maintenance tasks in progress during one operational phase can be interrupted if that phase ends before the repair is completed. For example, a crew delay or spare parts order may extend the duration of a repair beyond the duration of the phase. As described next, the software handles these interruptions differently, based on the stage in which the repair was interrupted and whether or not the failed block is present in the next contiguous phase.
- 1. If a phase ends during the repair of a failed block and the block is present in the next contiguous phase:
- a) If the same task is present in both phases, then the task will continue as-is in the next phase. This is considered an uninterrupted event, and counts as a single unique event at both the block and the system level.
- b) If the interrupted task is not used in the next phase, then the task is cancelled and new tasks are applied as needed. In this case, all crew calls are cancelled and spare parts are restocked.
- 1) If the repair has started or the crew is delayed (crew logistic delay), the call will be assumed accepted and the component will be charged for it. If the crew was occupied with another component’s repair, the call will be assumed rejected and hence not charged to the component.
- 2) If the call for spare parts incurred emergency charges, those are charged to the block; otherwise, there are no other charges to the block.
- 1. If a phase ends during the repair of a failed block and the block is present in the next contiguous phase:
- 2. If a phase ends during the repair of a failed block and the block is not present in the next contiguous phase, then the task is cancelled and new tasks are applied as needed. All crew calls are cancelled and spare parts are restocked:
- a) If the repair has started or the crew is delayed (crew logistic delay), the call will be assumed accepted and the component will be charged for it. If the crew was occupied with another component’s repair, the call will be assumed rejected and hence not charged to the component.
- b) If the call for spare parts incurred emergency charges, those are charged to the block; otherwise, there are no other charges to the block.
- c) Discontinuous events are counted as two distinct events at both the block and the system level.
- d) When the system fails in a phase that has a failure path leading to a stop block, the system will remain down for the remainder of the simulation. From that point on, the blocks that are down are assumed unavailable and the blocks that are up are assumed operational for availability calculations.
- 2. If a phase ends during the repair of a failed block and the block is not present in the next contiguous phase, then the task is cancelled and new tasks are applied as needed. All crew calls are cancelled and spare parts are restocked:
Rules & Assumptions for the Start New Simulation option
When a system failure occurs in a phase with the option to Start New Simulation, the simulation is aborted. Once this failure occurs, the following assumptions apply to the results:
- • Components that are under repair or maintenance remain down and unavailable for the rest of the simulation.
- • Components that are operating remain up for the rest of the simulation.
Rules & Assumptions for a Maintenance Phase
A system is considered down and unavailable during the execution of a maintenance phase and remains down until all components have been repaired or maintained according to the properties specified for the maintenance phase. A maintenance phase is executed when the simulation reaches the phase while progressing through the phase diagram, either following a success path or a failure path. The following assumptions apply to both cases.
- 1. When a component enters a maintenance phase in a down state, the following rules apply:
- a) If a task is in progress for this component, the event will transfer to the maintenance phase provided that the same task is present in the maintenance phase. The rules for interrupted tasks apply as noted above.
- b) If the component is failed but no corrective maintenance is in progress (either because the component was non-repairable in the phase where it failed or because it had a task scheduled to be executed upon inspection and was waiting for an inspection), a repair is initiated according to the corrective maintenance properties specified for the component in the maintenance phase.
- c) Failed components are fixed in the order in which they failed.
- 2. When a component enters a maintenance phase in an operating state, the following rules apply:
- a) Maintenance will be scheduled as follows:
- 1) Tasks based on intervals or upon start of a maintenance phase
- 2) Tasks based on events in a maintenance group, where the triggering event applies to a block
- 3) Tasks based on system down
- 4) Tasks based on events in a maintenance group, where the triggering event applies to a subdiagram
- Within these categories, order is determined according to the priorities specified in the maintenance template (i.e., the higher the task is on the list, the higher the priority).
- a) Maintenance will be scheduled as follows:
- 1. When a component enters a maintenance phase in a down state, the following rules apply:
- b) An inspection or preventive task may be initiated, if applicable, with inspections taking precedence over preventive tasks. Inspections and/or preventive tasks are initiated if one of the following applies:
- 1) Upon certain events:
- a) The task is set to be performed when a maintenance phase starts.
- b) The policy is set to be performed based on events in a maintenance group and one of those events occurs within the one of the specified maintenance groups. Note that such a triggered maintenance does not follow the priorities specified in the maintenance template, but is sent to the end of the queue for repair.
- c) The task is set to be performed whenever the system is down.
- 2) At certain intervals:
- a) The task is set to be performed at a fixed time interval, based on either item age or calendar time, and the maintenance falls within the maintenance threshold specified in the maintenance phase.
- 1) Upon certain events:
- b) An inspection or preventive task may be initiated, if applicable, with inspections taking precedence over preventive tasks. Inspections and/or preventive tasks are initiated if one of the following applies:
- If the inspection task is not set to bring either the item or the system down, the inspection will still be considered a downing inspection.
Finally, if a block enters a maintenance phase in a failed state:
- 1. If the block does not have a corrective task in the maintenance phase but does have an on condition task, the preventive portion of the on condition task is triggered immediately in order to restore the block.
- 2. A maintenance phase will not end until all components are restored. Therefore, if any failed block does not have a task that restores it, the maintenance phase will not end.
Maintenance Phase Properties
Maintenance Template
This specifies the maintenance template to be used in the currently selected maintenance phase.
System Age Threshold
System Age Threshold (Preventive/Inspection Policy) property provides the ability to add some flexibility to the timing of scheduled preventive maintenance actions and/or inspections. It is used to specify an age interval when a preventive maintenance action or inspection will be performed. This helps in optimizing the resources allocated to repair the system during a maintenance phase by performing preventive maintenance actions or inspections when the system is already down in a maintenance phase. For example, a preventive maintenance action is scheduled for a car (e.g. an oil change, tire rotation, etc.) every 60,000 miles, but a system downing failure of an unrelated component occurs at 55,000 miles. Here the system age threshold will determine whether the preventive maintenance will be performed earlier than scheduled. If the system age threshold is 0.9, the preventive maintenance will be performed since the failure occurred after the system accumulated 91.67% of the time to the scheduled maintenance or is within 8.33%, (60,000-55,000)/60,000= 8.33%, of the system age at which the preventive maintenance was originally scheduled. If the system age threshold was 0.95, the preventive maintenance will not be performed at 55,000 miles, since the system failure did not occur within 5% of the system age at which the preventive maintenance was originally scheduled (1-0.95=0.05 or 5%).
Illustrating System Age Threshold
To illustrate System Age Threshold, consider the deterministic scenario represented in Figures sysage1 , sysage2 and sysage3.
In this example, a system has two components: Block A and Block B. The system undertakes a mission that can be divided into two phases. The first phase is an operational phase of duration 1370 hrs with both the components in a parallel configuration. In this phase Block A fails every 750 hrs while Block B fails every 1300 hrs. Corrective maintenance action on Block A in this phase requires 100 hrs to be completed. A preventive maintenance of 20 hrs duration also occurs on Block A every 500 hrs. No maintenance can be carried out on Block B in this phase. The Continue Simulation option is selected for the On System Failure property for this phase. The second phase of the mission is a maintenance phase. In this phase Block A has the same maintenance actions as the those in phase 1. A corrective maintenance of 100 hrs duration is defined for Block B. Phase 2 also has a value of 0.70 set for the System Age Threshold. All maintenance actions during the entire mission of the system have a type II restoration factor of 1.
The system behavior from 0 to 3500 hrs is shown in Figure SysAgeThreshEx and described next.
- Phase 1 begins at time 0 hrs. The duration of this phase is 1370 hrs.
- At 500 hrs the first of the scheduled PMs for Block A begins. The duration of these maintenance tasks is 20 hrs. The scheduled maintenance ends at 520 hrs.
- At 1000 hrs another PM occurs for Block A based on the set policy. This maintenance ends at 1020 hrs.
- At 1300 hrs Block B fails after accumulating an age of 1300 hrs. A system failure does not occur as Block B is in a parallel configuration with Block A in this phase. Repairs for Block B are not defined in this phase. As a result Block B remains in a failed state.
- At 1370 hrs phase 1 ends and phase 2 begins. Phase 2 is a maintenance phase. Block B is repairable in this phase and has a CM duration of 100 hrs. As a result, repairs on Block B begin and are completed at 1470 hrs. Block A has the next PM scheduled to occur at 1500 hrs.
However, phase 2 has a System Age Threshold for Preventive and Inspection Policies of 0.7. The time remaining to the next PM is 130 hrs (1500-1370=130 hrs). This remaining time over the PM policy time of 500 hrs is 26%. This is within 0.3 (1-0.70=0.3) or 30% corresponding to the threshold value of 0.70. Thus the PM task that is to occur at 1500 hrs is carried out in the maintenance phase from 1370 hrs to 1390 hrs while no PM occurs at 1500 hrs. All maintenance actions are completed by 1470 hrs and phase 2 ends at this time. This completes the first cycle of operation for the phase diagram.
- At 1470 hrs phase 1 begins in the second cycle.
- At 2000 hrs, the next PM for Block A begins. This maintenance ends at 2020 hrs.
- At 2500 hrs, another PM is carried out on Block A and is completed by 2520 hrs.
- At 2770 hrs, Block B fails in the second cycle of phase 1 after accumulating an age of 1300 hrs. Since no repair is defined for the block in this phase, it remains in a failed state.
- At 2840 hrs, phase 1 completes its duration of 1370 hrs and ends. Phase 2 begins in the second cycle and the corrective maintenance, defined for a duration of 100 hrs for Block B, begins. This repair action ends at 2940 hrs. For Block A the time remaining until the next PM at 3000 hrs is 160 hrs (3000-2840=160 hrs). This remaining time over the PM policy of 500 hrs is 32%. This is not within 30% corresponding to the threshold value of 0.70. Thus the PM due at 3000 hrs is not considered close enough to the beginning of the maintenance phase and is not carried out in this phase. At 2940 hrs all maintenance actions are completed in phase 2 and phase 2 ends. This also completes the second cycle of operation for the phase diagram.
- At 2940 hrs phase 1 begins in the third cycle.
- At 3000 hrs the scheduled maintenance on Block A occurs. This PM ends at 3020 hrs.
- At 3500 hrs the simulation ends.
Understanding RPD Simulation Results
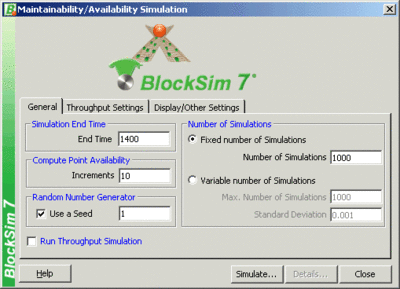
BlockSim provides a number of results at the overall system level and at the individual phase level when a simulation is run on phase diagrams. To illustrate these results, consider the probabilistic scenario of Figure GotoMaintPhaseEx used to illustrate the Go to Maintenance Phase option. Assume that phase 2 has the option to Start New Simulation selected for the On System Failure property instead of the Go to Maintenance Phase option in the original example. The phase properties for the resulting phase diagram are shown next. Some of the results obtained from BlockSim after running the 1,000 simulations, using the settings shown in Figuresimsett23, are shown in Figure SimResultsExResults.
Phases Summary Results
Cycle
This column displays the cycle number of the phase for which the results are recorded. Depending on the duration of the phase, the simulation end time and other phase properties, a phase diagram may be partially or totally executed (cycled) more than once. The Cycle column denotes which cycle the results of a particular phase apply to.
Mean Duration
Mean duration is the average of the duration of a phase over all of the simulations in a particular cycle. It is calculated by dividing the total duration of a phase in a particular cycle by the number of executions (see 11.4.1.6). For example, row 3 displays the mean duration of phase 1 in the first cycle as 307.3127 hrs. This means that on the average, for the 1,000 simulations, the duration of phase 1 in the first cycle was 307.3127 hrs. A dash (-) is displayed in row 19 for the mean duration of phase 2 in the sixth cycle indicating that BlockSim is unable to calculate the mean duration for this phase in the sixth cycle. This results from the fact that phase 2 never gets executed in the sixth cycle during any of the 1,000 simulations.
End of Phase Point Availability (EPPA)
This is the availability at the end of the phase in a particular cycle. It is the ratio of the number of times the system was available at the end of the phase to the sum of the number of executions and the number of aborted executions of the phase. For example, phase 2 gets executed once in the fifth cycle and the system is available at the end of the phase during this execution. There are no aborted executions. Thus the End of Phase Point Availability for this phase is:
- [math]\displaystyle{ \begin{align} EPPA= & \frac{Number of times system was available at phase end}{Number of executions +\text{ }Number of aborted executions} \\ = & \frac{1}{1+0} \\ = & 1 \end{align} }[/math]
Reliability
- This is the probability that the system has not failed during the execution of the phase for a particular cycle. It is calculated by dividing the number of times the system encounters its first failure during the phase to the sum of the number of executions (see 11.4.1.6) and the number of aborted executions (see 11.4.1.7). The resulting ratio is the unreliability, and the reliability value is obtained by subtracting this ratio from 1. A reliability value of 0.3864 is calculated for the first cycle of phase 2. There are 108 executions of phase 2 in the first cycle where there is a system failure, and the total number of executions is 176. There are no aborted executions. Thus, the reliability is:
- [math]\displaystyle{ \begin{align} Reliability= & 1-\frac{Executions with system failures}{Number of executions +\text{ }Number of aborted executions} \\ = & 1-\frac{108}{176+0} \\ = & 0.3864 \end{align} }[/math]
Throughput
The average throughput processed during a phase in a particular cycle is displayed in this column. It is the ratio of total throughput for the phase in the cycle to the number of executions of the phase. Throughput is discussed in more detail in Section 11.10.
Executions
This column gives the number of times a phase is reached for a particular cycle. It is the sum of the number of simulations for which the phase is executed.
Aborted Executions
Aborted Executions displays the number of times a phase is aborted because the simulation ends due to a preceding phase. This takes place when a system failure occurs in a phase having the Start New Simulation option selected for the On System Failure property.
RS ACI
ReliaSoft's Aborted Criticality Index (RS ACI) for a phase during a particular cycle is a relative index showing the percentage of times a simulation is terminated because of a system failure occurring in the phase. RS ACI applies only to those phases that have the Start New Simulation option selected for the On System Failure property. It is calculated by counting the number of times a phase in a particular cycle has a system failure that leads to termination of the simulation, and dividing this by the total number of times the simulation is terminated because of system failures in all the phases. For example, for phase 2 in the first cycle, RS ACI is 56.84%. This means that 56.84% of the times that the simulation was aborted, it was due to a system failure in the first cycle of phase 2.
Other Results
In addition to the Phases Summary Results, all other simulation results available at the system level are also available for each individual phase. Results for System, Blocks, Crews, Spare Pools and Reports are all available for each phase of the phase diagram. See Section 8.2 of Chapter 8 for more details on these results.
Phase Throughput
Phase throughput is the maximum number of items that a system can process during a particular phase. It is defined at the phase level as a phase property in an operational phase. For a detailed discussion of throughput at the block level see Chapter 9.
Phase throughput can be thought of as the initial throughput that enters the system. For example, imagine a textile factory that receives different quantities of raw materials during different seasons. These seasons could be treated as different phases. In this case a phase may be seen as sending a certain quantity of units to the first component of the system (the textile factory in this case). Depending on the capacity and availability of the factory, these units may be all processed or a backlog may accumulate.
Alternatively, phase throughput can be used as a constraint to the throughput of the system. An example would be the start up period in a processing plant. When the plant stops operating, the equipment requires a warm up period before reaching its maximum production capacity. In this case the phase throughput may be used to limit the capacity of the first component which in turn would limit the throughput of the rest of the system. Note that there is no phase-related backlog for this example. In BlockSim this can be modeled by checking the ignore backlog option (see 9.2.2.1) in the block properties window for the first component. Both constant and variable throughput can be used in a phase. The methodology used for variable throughput is discussed next, and examples using both constant and variable throughput follow.
Variable (Time-Varying) Throughput
Time-varying throughput can be specified at the phase level through the Variable Throughput property of an operational phase. Variable throughput permits modeling of scenarios where the throughput changes over time. For variable throughput three general models are available in BlockSim. Each of these models has two parameters [math]\displaystyle{ a }[/math] and [math]\displaystyle{ b }[/math] which are specified by the user. These models are discussed below:
- 1. Linear model:
- [math]\displaystyle{ y=ax+b }[/math]
This model describes the change in throughput [math]\displaystyle{ y }[/math] as a linear function of time [math]\displaystyle{ x }[/math] . Throughput processed between any two points of time [math]\displaystyle{ {{x}_{1}} }[/math] and [math]\displaystyle{ {{x}_{2}} }[/math] is obtained by integration of the linear function as:
- [math]\displaystyle{ \begin{align} \text{Linearly varying throughput}= & \mathop{}_{{{x}_{1}}}^{{{x}_{2}}}ydx \\ = & \mathop{}_{{{x}_{1}}}^{{{x}_{2}}}(ax+b)dx \\ = & \frac{a}{2}(x_{2}^{2}-x_{1}^{2})+b({{x}_{2}}-{{x}_{1}}) \end{align} }[/math]
- 2. Exponential model:
- [math]\displaystyle{ y=b{{e}^{ax}} }[/math]
This model describes the change in throughput [math]\displaystyle{ y }[/math] as an exponential function of time [math]\displaystyle{ x }[/math] . Throughput processed in a period of time between any two points [math]\displaystyle{ {{x}_{1}} }[/math] and [math]\displaystyle{ {{x}_{2}} }[/math] is obtained as:
- [math]\displaystyle{ \begin{align} \text{Exponentially varying throughput}= & \mathop{}_{{{x}_{1}}}^{{{x}_{2}}}ydx \\ = & \mathop{}_{{{x}_{1}}}^{{{x}_{2}}}b{{e}^{ax}}dx \\ = & \text{ }\frac{b}{a}({{e}^{a{{x}_{2}}}}-{{e}^{a{{x}_{1}}}}) \end{align} }[/math]
- 3. Power model:
- [math]\displaystyle{ y=b{{x}^{a}} }[/math]
This model describes the change in throughput [math]\displaystyle{ y }[/math] as a power function of time [math]\displaystyle{ x }[/math] . Throughput processed between two points of time [math]\displaystyle{ {{x}_{1}} }[/math] and [math]\displaystyle{ {{x}_{2}} }[/math] is obtained as:
- [math]\displaystyle{ \begin{align} \text{Power varying throughput}= & \mathop{}_{{{x}_{1}}}^{{{x}_{2}}}ydx \\ = & \mathop{}_{{{x}_{1}}}^{{{x}_{2}}}b{{x}^{a}}dx \\ = & \frac{b}{a+1}(x_{2}^{a+1}-x_{1}^{a+1}) \end{align} }[/math]
All of the above models also have a user defined Maximum Throughput Capacity value. Once this maximum throughput capacity value is reached, the throughput per unit time becomes constant and equal in value to the maximum throughput capacity specified by the user. In this situation the variable throughput model would then act as a constant throughput model. The above models may at first glance seem limited, when in fact they do provide ample modeling flexibility. This flexibility is achieved by using these functions as building blocks for more complex functions. As an example, a step model can be easily created by using multiple phases, each with a constant throughput. A ramp model would use phases with linearly increasing functions in conjunction with constant phases, and so forth.
Illustrating Constant Throughput
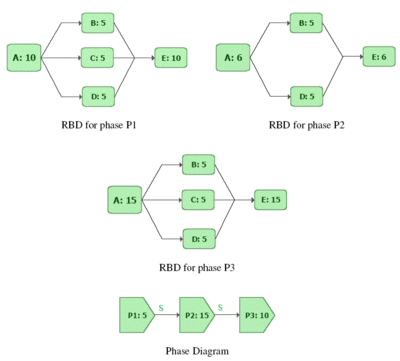
To examine throughput in phases consider a phase diagram of three phases with the respectively linked RBDs as shown in Figure cthrough1. Each phase has a duration of 10 hrs and the Continue Simulation option has been selected for the On System Failure property for all the phases. Blocks A through E process a number of items per hour as identified next to each letter (e.g. A : 10 implies that 10 units are processed per hour by block A). Similarly, each phase is marked with the constant throughput sent to the blocks in the phase (e.g. P1 : 5 implies phase P1 sends 5 units to its blocks ). For the sake of simplicity it is assumed that the blocks can never fail and that items are routed equally to each path (see 9.2.2.2). The ignore backlog option is left unchecked for all blocks in the phase diagram (see 9.2.2.1).
If a throughput simulation with an end time of 60 hrs is run on the phase diagram, the following scenario can be observed:
- 1. Phase P1 from 0 to 10 hrs
- a) Phase P1 sends 5 units in the first hour to block A. The capacity of A in this phase is 10 units per hour. A processes these 5 units with an excess capacity of 5 units in the first hour.
- b) The 5 units processed by A are routed equally over the three paths to B, C and D. Each of these blocks receives 1.67 units in the first hour. The capacity of each of these blocks is 5 units per hour. Thus B, C and D each process 1.67 units with an excess capacity of 3.33 units in the first hour.
- c) B, C and D route each of their 1.67 units to E. The capacity of E in this phase is 10 units per hour. E processes the total of 5 units with an excess capacity of 5 units in the first hour.
- d) The above steps are repeated for the first ten hours to complete phase P1.
- 1. Phase P1 from 0 to 10 hrs
A summary result table for phase P1 is shown next.
- 2. Phase P2 from 10 to 20 hrs
- a) Phase P2 sends 15 units in its first hour to block A. The capacity of A in this phase is changed from the previous phase and is now 6 units per hour. Thus A is able to process only 6 units while there is a backlog of 9 units per hour.
- b) The 6 units processed by A are routed equally to B and D as C is absent in this phase. B and D get 3 units each. The capacity of each of these blocks is 5 units per hour. Thus B and D process 3 units with an excess capacity of 2 units each in the first hour of the second phase.
- c) B and D route a total of 6 units to E. The capacity of E in this phase is 6 units per hour. Thus, E processes 6 units in the first hour of phase 2 with no excess capacity and no backlog.
- d) The above steps are repeated for the ten hours of phase P2. At 20 hrs phase P2 ends.
- 2. Phase P2 from 10 to 20 hrs
A summary result table for phase P2 is shown next.
- 3. Phase P3 from 20 to 30 hrs
- a) Phase P3 sends 10 units in its first hour to block A. The capacity of A in this phase is now 15 units per hour. Thus A is able to process all 10 units sent by P3 and also process 5 units of the backlog from phase P2. Thus, during the first hour of phase P3, A processes 15 units that includes a backlog of 5 units. Since A is used to its full capacity excess capacity of A is zero.
- b) The 15 units processed by A in the first hour are routed equally over three paths to B, C and D as block C is available again in this phase. B, C and D receive 5 units each. The capacity of each of these block is 5 units per hour. Thus, B, C and D process 5 units each to full capacity with no excess capacity during the first hour of the third phase.
- c) B, C and D route each of their 5 units to E. The capacity of E in this phase is 15 units per hour. Thus, E processes 15 units in the first hour of phase P3 with no excess capacity and no backlog.
- d) The above steps are repeated for the ten hours of phase P3. It should be noted that although some of the backlog from phase P2 gets processed in phase P3 [math]\displaystyle{ (5\times 10=50 }[/math] units from the backlog get processed [math]\displaystyle{ ) }[/math] , not all 90 backlogged units are processed ( [math]\displaystyle{ 90-50=40 }[/math] units remain). The remaining units cannot be shown as backlog for phase P3 as these were generated in phase P2. To avoid confusion between backlogs of different phases in a simulation that may have a number of cycles of a phase diagram, BlockSim does not display backlog values at the individual phase level. At 30 hrs phase P3 ends. This also ends the first cycle of the phase diagram.
- 3. Phase P3 from 20 to 30 hrs
A summary result table for phase P3 is shown next.
- 4. Phase P1 in the second cycle from 30 to 40 hrs
- a) As in the first cycle phase P1 sends 5 units to block A in the first hour. The capacity of A in this phase is 10 units per hour. Thus A is able to process all 5 units sent by P1 and also process 5 units of the backlog from the first cycle. Thus, during the first hour of the second cycle of phase P1, A processes 10 units that includes a backlog of 5 units. Since there is a backlog of 40 units from the first cycle, this is processed by A in the first eight hours of the second cycle. During the last two hours of the second cycle of phase P1, A only processes the 5 units per hour it receives from P1 and has an excess capacity of 5 units per hour. Thus, by the end of this phase A processes a total of 90 units (50 units from P1 and 40 units of backlog) with an excess capacity of 10 units.
- b) Units processed by block A are routed equally to B, C and D. During the first eight hours of the second cycle of phase P1, 10 units per hour are sent by A to B, C and D. Each of these blocks gets 3.33 units per hour. The capacity of each of these blocks is 5 units per hour. Thus, during the first eight hours of P1 in the second cycle, B, C and D process 3.33 units per hour with an excess capacity of 1.67 units per hour. During the last two hours, A processes 5 units per hour. Thus B, C and D process 1.67 units per hour with an excess capacity of 3.33 units per hour. At the end of the phase, B, C and D each process a total of 30 units [math]\displaystyle{ (3.33\times 8+1.67\times 2=30) }[/math] with an excess capacity of 20 units [math]\displaystyle{ (1.67\times 8+3.33\times 2=20) }[/math] .
- c) B, C and D route each of their units to E. The capacity of E in this phase is 10 units per hour. E processes 10 units per hour with no excess capacity during the first eight hours of the phase. During the last two hour E processes 5 units per hour with an excess capacity of 5 units per hour. By the end of the phase E processes a total of 90 units with and excess capacity of 10 units.
- 4. Phase P1 in the second cycle from 30 to 40 hrs
A summary result table for the second cycle of phase P1 is shown next.
- 5. Phase P2 in the second cycle from 40 to 50 hrs
- a) As in the first cycle phase P2 sends 15 units in its first hour to block A. The capacity of A in this phase is 6 units per hour. Thus, A processes only 6 units while there is a backlog of 9 units per hour.
- b) The 6 units processed by A are routed equally to B and D as C is absent in this phase. B and D receive 3 units each. The capacity of each of these blocks is 5 units per hour. Thus, in the second cycle B and D process 3 units with an excess capacity of 2 units each in the first hour of the second phase.
- c) B and D route a total of 6 units to E. The capacity of E in this phase is 6 units per hour. Thus E processes 6 units in the first hour of the phase with no excess capacity and no backlog.
- d) The above steps are repeated for the ten hours of phase P2. At 50 hrs phase P2 ends in the second cycle.
- 5. Phase P2 in the second cycle from 40 to 50 hrs
A summary result table for the second cycle of phase P2 is shown next.
- 6 Phase P3 in the second cycle from 50 to 60 hrs
- a) Phase P3 sends 10 units in its first hour to block A in the second cycle. The capacity of A in this phase is 15 units per hour. Thus, A is able to process all 10 units sent by P3 and also process 5 units of backlog from the second cycle of phase P2. Thus, during the first hour of phase P3, A processes 15 units that includes a backlog of 5 units. Since A is used to its full capacity, excess capacity of A is zero.
- b) The 15 units processed by A in the first hour are routed equally over three paths to B, C and D as block C is available again in this phase. B, C and D receive 5 units each. The capacity of each of these block is 5 units per hour. Thus, B, C and D process 5 units each to full capacity with no excess capacity during the first hour of the third phase.
- c) B, C and D route each of their 5 units to E. The capacity of E in this phase is 15 units per hour. Thus, E processes 15 units in the first hour of phase P3 with no excess capacity and no backlog.
- d) The above steps are repeated for the ten hours of phase P3. At 60 hrs phase P3 ends. This ends the second cycle of the phase diagram and also marks the end of the simulation.
A summary result table for the second cycle of phase P3 is shown next.
A summary result table for the overall system for the simulation from 0 to 60 hrs is shown in Table 7.
Illustrating Variable Throughput
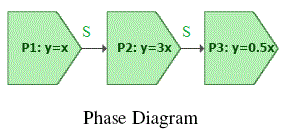
To examine variable throughput in phase diagrams, consider the phase diagram used previously in section 11.10.2 to illustrate constant throughput. All phase properties and linked RBDs remain unchanged for this illustration except that all the three phases now use variable throughput models. For the first phase P1 the variable throughput model used is [math]\displaystyle{ y=x }[/math] (which is the linear model [math]\displaystyle{ y=ax+b }[/math] with parameters [math]\displaystyle{ a=1 }[/math] and [math]\displaystyle{ b=0 }[/math] ). For the second phase P2 the model used is [math]\displaystyle{ y=3x }[/math] (which is the linear model [math]\displaystyle{ y=ax+b }[/math] with parameters [math]\displaystyle{ a=3 }[/math] and [math]\displaystyle{ b=0 }[/math]). The third phase uses [math]\displaystyle{ y=0.5x }[/math] as the variable throughput model (which is the linear model [math]\displaystyle{ y=ax+b }[/math] with parameters [math]\displaystyle{ a=0.5 }[/math] and [math]\displaystyle{ b=0 }[/math]). Phases P1 and P2 have a value of 500 units per hour set for the maximum throughput capacity. This relatively larger value of throughput is set for the two phases so that the phases do not reach their maximum throughput value during the simulation. Phase P3 has a value of 4 units per hour set as the maximum throughput capacity. All phases have a duration of ten hours as in section 11.10.2. For the sake of simplicity it is assumed that the blocks can never fail and that items are routed equally to each path (see 9.2.2.2). The ignore backlog option is left unchecked for all blocks in the phase diagram (see 9.2.2.1).
If a throughput simulation with an end time of 60 hrs is run on the phase diagram, the following scenario can be observed:
- 1. Phase P1 from 0 to 10 hrs
- a) The throughput from phase P1 follows a time-varying model given by [math]\displaystyle{ y=ax+b }[/math] with parameters [math]\displaystyle{ a=1 }[/math] and [math]\displaystyle{ b=0 }[/math] . Thus, during the first hour the throughput sent by phase P1 to block A is:
- [math]\displaystyle{ \begin{align} Phase throughput from 0 to1hr= & \frac{a}{2}(x_{2}^{2}-x_{1}^{2})+b({{x}_{2}}-{{x}_{1}}) \\ = & \frac{1}{2}({{1}^{2}}-{{0}^{2}})+0(1-0) \\ = & 0.5\text{ }units \end{align} }[/math]
- And the throughput sent by phase P1 to block A in the second hour is:
- [math]\displaystyle{ \begin{align} Phase throughput from 1 to 2 hrs= & \frac{a}{2}(x_{2}^{2}-x_{1}^{2})+b({{x}_{2}}-{{x}_{1}}) \\ = & \frac{1}{2}({{2}^{2}}-{{1}^{2}})+0(2-1) \\ = & 1.5\text{ }units \end{align} }[/math]
It can be seen that throughput from phase P1 sent to block A increases with time. But the capacity of block A remains constant at 10 units per hour during the entire phase P1. Thus, it becomes important to know the point of time when the number of units sent by P1 exceed the capacity of block A and A starts accumulating a backlog. This can be obtained by solving the throughput model for phase P1 ( [math]\displaystyle{ y=x }[/math] ) using the capacity of block A by substituting [math]\displaystyle{ y }[/math] as the block capacity as shown next:
- [math]\displaystyle{ \begin{align} y= & x \\ or\text{ }10= & x \end{align} }[/math]
Thus, at time [math]\displaystyle{ x=10 }[/math] hrs the number of units supplied per hour by phase P1 will equal the capacity of block A. At this point of time A will function to its full capacity with no excess capacity and no backlog. Beyond this point the units sent by P1 will exceed the capacity of A and A will start accumulating a backlog. Since the duration of P1 is 10 hrs, backlog at A will not be a concern in this phase because up to this time the capacity of A exceeds the units sent by P1. Thus the total units sent by P1 to block A during the phase duration of 10 hrs is:
- [math]\displaystyle{ \begin{align} = & \frac{a}{2}(x_{2}^{2}-x_{1}^{2})+b({{x}_{2}}-{{x}_{1}}) \\ = & \frac{1}{2}({{10}^{2}}-{{0}^{2}})+0(10-0) \\ = & 50\text{ }units \end{align} }[/math]
The total number of units that can be processed by block A (or the capacity of A) during phase P1 is:
- [math]\displaystyle{ \begin{align} = & 10\times 10 \\ = & 100\text{ }units \end{align} }[/math]
Thus, during the first phase, A processes all 50 units sent by P1 with an excess capacity of 50 units (100-50=50 units).
- -The 50 units processed by block A from time 0 to 10 hrs are routed equally over three paths to blocks B, C and D. Each of these blocks gets a total of 16.67 units from time 0 to 10 hrs. The capacity of each of these blocks is 5 units per hour. Thus, the total capacity of each of the blocks from time 0 to 10 hrs is 50 units. As a result, each of the three units processes 16.67 units in phase P1 with an excess capacity of 33.33 units.
- -B, C and D route each of their 16.67 units to block E. The capacity of E in this phase is 10 units per hour or 100 units for the ten hours. Thus, E processes a total of 50 units from blocks B, C and D with an excess capacity of 50 units during the first phase P1. At 10 hrs phase P1 ends and phase P2 begins.
A summary result table for phase P1 is shown next.
- 2. Phase P2 from 10 to 20 hrs
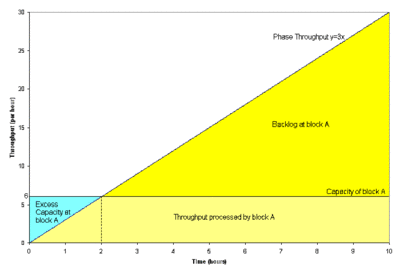
- -The throughput of phase P2 follows the model [math]\displaystyle{ y=ax+b }[/math] with [math]\displaystyle{ a=3 }[/math] and [math]\displaystyle{ b=0 }[/math] . The throughput from P2 goes to block A. The capacity of block A in this phase is 6 units per hour. The point of time when the number of units sent by P2 equals the capacity of block A can be obtained by substituting the capacity of block A into the model equation ( [math]\displaystyle{ y=3x }[/math] ) as shown next:
- [math]\displaystyle{ \begin{align} y= & 3x \\ or\text{ }6= & 3x \\ or\text{ }x= & 2 \end{align} }[/math]
Thus, at [math]\displaystyle{ x=2 }[/math] hrs of phase P2 (or at the total simulation time of 12 hrs), the number of units sent per hour by phase P2 equals the capacity of block A. Thus, during the first two hours of phase P2, A will have excess capacity. The total number of units sent by phase P2 during the first two hours of the phase are:
- [math]\displaystyle{ \begin{align} = & \frac{a}{2}(x_{2}^{2}-x_{1}^{2})+b({{x}_{2}}-{{x}_{1}}) \\ = & \frac{3}{2}({{2}^{2}}-{{0}^{2}})+0(2-0) \\ = & 6\text{ }units \end{align} }[/math]
The total capacity of A during the first two hours of phase P2 is:
- [math]\displaystyle{ \begin{align} = & 6\times 2 \\ = & 12\text{ }units \end{align} }[/math]
Thus A processes a total of 6 units in the first two hours of phase P2 with an excess capacity of 6 units (12-6=6 units). During the last eight hours of the phase (from the second hour to the tenth hour) A will have a backlog as the number of units sent by phase P2 will exceed A's capacity. The total number of units sent by phase P2 during the last eight hours of the phase are:
- [math]\displaystyle{ \begin{align} = & \frac{a}{2}(x_{2}^{2}-x_{1}^{2})+b({{x}_{2}}-{{x}_{1}}) \\ = & \frac{3}{2}({{10}^{2}}-{{2}^{2}})+0(10-2) \\ = & 144\text{ }units \end{align} }[/math]
The total capacity of A during these eight hours of phase P2 is:
- [math]\displaystyle{ \begin{align} = & 6\times 8 \\ = & 48\text{ }units \end{align} }[/math]
Thus, during the last eight hours of phase P2, A will process a total of 48 units with a backlog of 96 units (144-48=96 units). A graphical representation of the above scenario for block A during phase P2 is shown in Figure VariableTpExFig.
- -The units processed by A are routed equally to blocks B and D as block C is absent in this phase. During the first two hours A sends a total of 6 units that are divided equally among B and D with each block getting 3 units. The capacity of these blocks in this phase is 5 units per hour. Thus the total capacity of each of these blocks during the first two hours of phase P2 is:
- [math]\displaystyle{ \begin{align} = & 5\times 2 \\ = & 10\text{ }units \end{align} }[/math]
As a result B and D each process 3 units in the first two hours of phase P2 with an excess capacity of 7 units (10-3=7 units). During the last eight hours of phase P2, A sends a total of 48 units to B and D with each block receiving 24 units. The capacity of each of these blocks during these eight hours is:
- [math]\displaystyle{ \begin{align} = & 5\times 8 \\ = & 40\text{ }units \end{align} }[/math]
Thus B and D process 24 units in the last eight hours of phase P2 with an excess capacity of 16 units (40-24=16 units).
- -The units processed by B and D are sent to block E. The capacity of E in this phase is 6 units per hour. During the first two hours of phase P2, a total of 6 units are sent to block E. The total capacity of E during this period of time is:
- [math]\displaystyle{ \begin{align} = & 6\times 2 \\ = & 12\text{ }units \end{align} }[/math]
Consequently E processes 6 units in the first two hours of phase P2 with an excess capacity of 6 units (12-6=6 units). During the last eight hours of the phase, B and D send a total of 48 units to E. The capacity of E during this time is:
- [math]\displaystyle{ \begin{align} = & 6\times 8 \\ = & 48\text{ }units \end{align} }[/math]
Thus E processes 48 units in the last eight hours of P2 with no excess capacity and no backlog. At 20 hrs phase P2 ends and phase P3 begins.
A summary result table for phase P2 is shown next.
- 3. Phase P3 from 20 to 30 hrs
- -The throughput of phase P3 follows the model [math]\displaystyle{ y=ax+b }[/math] with [math]\displaystyle{ a=0.5 }[/math] and [math]\displaystyle{ b=0 }[/math] . A maximum throughput capacity of 4 units per hour is also set for this phase. The throughput from this phase goes to block A. The capacity of block A in this phase is 15 units per hour. Thus it can be seen that the throughput sent by P3 will never exceed the capacity of block A in this phase. It can also be seen that at some point of time the throughput of phase P3 will reach the maximum throughput capacity of 4 units per hour and thereafter a constant throughput of 4 units per hour will be sent by phase P3. This point of time can be calculated by solving the linear throughput model for the phase [math]\displaystyle{ y=0.5x }[/math] by substituting [math]\displaystyle{ y }[/math] as the maximum throughput capacity as shown next:
- [math]\displaystyle{ \begin{align} y= & 0.5x \\ or\text{ }4= & 0.5x \\ or\text{ }x= & 8 \end{align} }[/math]
Thus, at time [math]\displaystyle{ x=8 }[/math] hrs of phase P3 (or at the time of 28 hrs) the number of units sent per hour by phase P3 will reach the constant value of 4 units per hour. In the first eight hours of the phase the throughput will remain variable. The total number of units sent by P3 to block A during this time is given by:
- [math]\displaystyle{ \begin{align} = & \frac{a}{2}(x_{2}^{2}-x_{1}^{2})+b({{x}_{2}}-{{x}_{1}}) \\ = & \frac{0.5}{2}({{8}^{2}}-{{0}^{2}})+0(8-0) \\ = & 16\text{ }units \end{align} }[/math]
The total capacity of A during the first eight hours of phase P3 is:
- [math]\displaystyle{ \begin{align} = & 15\times 8 \\ = & 120\text{ }units \end{align} }[/math]
Consequently, it can be seen that A has an excess capacity of 104 units (120-16=104 units). Thus, A will be able to process all of the 96 units of backlog from phase P2 during these eight hours. As a result A will process a total of 112 units (16 units from P3 and 96 units from the backlog of phase P2) with an excess capacity of 8 units (120-112=8 units) during the first eight hours of phase P3. In the last two hours of this phase, a constant throughput of 4 units per hour is sent to A, thus the total number of units sent to A during the last two hours are:
- [math]\displaystyle{ \begin{align} = & 4\times 2 \\ = & 8\text{ }units \end{align} }[/math]
The capacity of A during these two hours is:
- [math]\displaystyle{ \begin{align} = & 15\times 2 \\ = & 30\text{ }units \end{align} }[/math]
Thus, A will process 8 units in the last two hours of phase P3 with an excess capacity of 22 units (30-8=22 units).
- -The units processed by A are routed equally over three paths to B, C and D as block C is available again in this phase. During the first eight hours of phase P3 a total of 112 units are sent to B, C and D with each block receiving 37.33 units. The capacity of each of these block is 5 units per hour, thus the total capacity of each of the blocks during the first eight hours is:
- [math]\displaystyle{ \begin{align} = & 5\times 8 \\ = & 40\text{ }units \end{align} }[/math]
As a result B, C and D each process 37.33 units in the first eight hour of phase P3 with an excess capacity of 2.67 units (40-37.33=2.67 units). In the last two hours of the phase, A sends a total of 8 units, with each block getting 2.67 units. The capacity of B, C or D during these two hours is:
- [math]\displaystyle{ \begin{align} = & 5\times 2 \\ = & 10\text{ }units \end{align} }[/math]
Thus, B, C and D each process 2.67 units in the last two hours of phase P3 with an excess capacity of 7.33 units (10-2.67=7.33 units). At the end of these two hours phase P3 gets completed. This also marks the end of the simulation.
A summary result table for phase P3 is shown next.
A summary result table for the overall system for the simulation from 0 to 30 hrs is shown in Table 11.

