BlockSim Example: Phase with Failure or Success Paths: Difference between revisions
Dingzhou Cao (talk | contribs) |
Dingzhou Cao (talk | contribs) |
||
| Line 22: | Line 22: | ||
If there is no failure in Phase 1, upon finish, it goes to Phase 2. If there is a failure in Phase 1, it would go to Maintenance Phase 3 directly. If there is not failure in Phase 2, upon finish, it goes back to Phase 1. If there is a failure in Phase 2, it would to go Maintenance Phase 3. | If there is no failure in Phase 1, upon finish, it goes to Phase 2. If there is a failure in Phase 1, it would go to Maintenance Phase 3 directly. If there is not failure in Phase 2, upon finish, it goes back to Phase 1. If there is a failure in Phase 2, it would to go Maintenance Phase 3. | ||
====Block Up/Down==== | |||
Revision as of 19:11, 23 September 2011
Phase with F/S links
Purposes
The purposes of this example is to illustrate how to apply F/S links in Phase simulation.
RBDs for Phase and settings
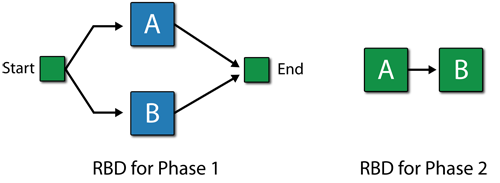
The RBDs for Phase 1 and Phase 2 are as followings:

In Phase 1, Block A follows Weibull distribution with Beta = 1.5 and Eta = 1000 hours. Block B follows Weibull distribution with Beta = 1.5 and Eta = 1200 hours. No maintenance.
In Phase 2, Block A follows Weibull distribution with Beta = 1.5 and Eta = 900 hours. Block B follows Weibull distribution with Beta = 1.5 and Eta = 1150 hours. No maintenance.
Example 1
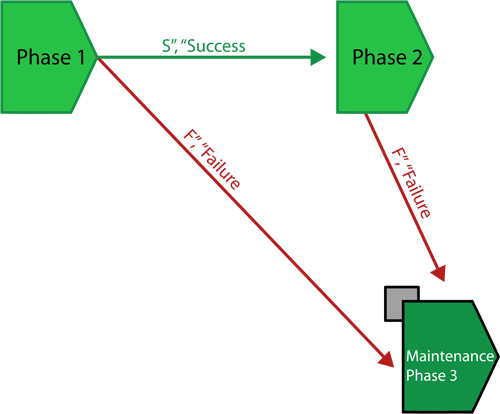
The Phase diagram is as followings:

Maintenance phase has a CM with duration 80 hours and PM with duration 20 hours for both Block A and B.
Phase 1 has duration 500 hours and Phase 2 has duration 100 hours.
If there is no failure in Phase 1, upon finish, it goes to Phase 2. If there is a failure in Phase 1, it would go to Maintenance Phase 3 directly. If there is not failure in Phase 2, upon finish, it goes back to Phase 1. If there is a failure in Phase 2, it would to go Maintenance Phase 3.